Week 13 - Integration test - PLX-DAQ, Chase vehicle simulation, LoRa interface
We have finalized on the plan of integrating the system as shown in Figure 1, and we will start working on it this week and the following weeks till completion. However, this is only a suggestion of our own design which may not be the actual design used for SunSPec 5, as we have yet to carry out further tests on practicality.

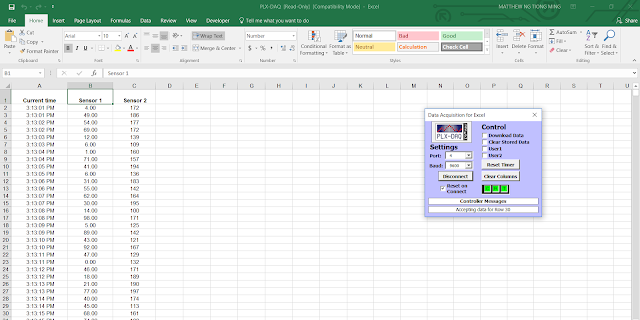
We have tested out how to use PLX-DAQ to record data using random generators in place of actual sensors for testing purposes. We have tested with Excel 2013 and it did not work as the "Data Acquisition for Excel" pop-out does not appear, but we face no problem with Excel 2016.
The following are to be written under void setup()
Serial.Println("CLEARDATA"); // Clear all previously stored data
Serial.Println("LABEL, INSERT_LABEL1, INSERT_LABEL2"); // Excel Column Title syntax
The following are to be written under void loop()
Serial.Print("DATA, INSERT_DATA1, INSERT_DATA2"); // Excel Column data syntax
 Figure 2: Arduino Serial.Monitor
PLX-DAQ Demo
Code for PLX-DAQ Demo:
long Test_1;
long Test_2;
void setup()
{
Serial.begin(9600);
// while the serial stream is not open, do nothing: // Need
while (!Serial) // while (!Serial) OR // while (!Serial) ;
{ // {
; // ;
} // } //for all leonardos if want serial.print under setup // Upload again for showing 2nd time.
Serial.println("CLEARDATA"); // To clear previously stored data
Serial.println("LABEL,Current time,Sensor 1, Sensor 2"); // Need "LABEL" to tell plx.daq name of column
randomSeed(analogRead(0));
}
void loop()
{
Test_1 = random(0, 100);
Test_2 = random(100, 200);
Serial.print("DATA, TIME,"); // Need "DATA" to start showing stuffs. "TIME" to literally show time.
Serial.print(Test_1); Serial.print(","); // Need "," to tell plx.daq to go to next column
Serial.println(Test_2);
delay(500);
}

Figure 1: Telemetry System Overview
The main problem of interfacing wireless communication with Arduino is that due to the way the Arduino receives it, it will receive char by char per loop. So any other parts of code in between the sending and receiving part will be sent along each time a char is sent. For example, the word "test" is being sent, and there is another program to send a voltage value, per say "50". The receiving end will receive in the following order: "t", "50", "e", "50", "s", "50", "t", "50".
There is a way to get around this problem by changing the Serial.write to Serial.print of a string, where we discovered the following:
String input = LoRaSerial.readString();
Serial.println(input);
//Serial.write(LoRaSerial.read()); // Prints char 1 by 1
//Serial.print(LoRaSerial.read()); // Shows in ASCII format
The following are to be written under void setup()
Serial.Println("CLEARDATA"); // Clear all previously stored data
Serial.Println("LABEL, INSERT_LABEL1, INSERT_LABEL2"); // Excel Column Title syntax
The following are to be written under void loop()
Serial.Print("DATA, INSERT_DATA1, INSERT_DATA2"); // Excel Column data syntax


Figure 3: PLX-DAQ with Excel 2016
Chase Vehicle Simulation
LoRa with Arduino Simulation
Code for PLX-DAQ Demo:
long Test_1;
long Test_2;
void setup()
{
Serial.begin(9600);
// while the serial stream is not open, do nothing: // Need
while (!Serial) // while (!Serial) OR // while (!Serial) ;
{ // {
; // ;
} // } //for all leonardos if want serial.print under setup // Upload again for showing 2nd time.
Serial.println("CLEARDATA"); // To clear previously stored data
Serial.println("LABEL,Current time,Sensor 1, Sensor 2"); // Need "LABEL" to tell plx.daq name of column
randomSeed(analogRead(0));
}
void loop()
{
Test_1 = random(0, 100);
Test_2 = random(100, 200);
Serial.print("DATA, TIME,"); // Need "DATA" to start showing stuffs. "TIME" to literally show time.
Serial.print(Test_1); Serial.print(","); // Need "," to tell plx.daq to go to next column
Serial.println(Test_2);
delay(500);
}


Comments
Post a Comment